I've always been used to the Redhat/Fedora way of setting up aliases in /etc/sysconfig/network-scripts-ifcfg-: but SuSe/Novell Linux is slightly different. I see a lot of hackish examples/bad advice on the internet on how to set it up on SuSe/Novell Linux so I figured I'd make a note of it here.
To do it "right" under SuSe, you modify the main configuration file for your ethernet adapter.
For example, 'ifcfg-eth-id-de:ad:co:ed:ba:be' where the de:ad:co:ed:ba:be is replaced by a real MAC address.
As an example, you want the main IP of the system to be statically set to 192.168.100.1, and the other IPs to be 192.168.100.100, 192.168.100.101, and 192.168.100.102
Your original configuration will probably look something like this:
BOOTPROTO='static'
BROADCAST='192.168.100.255'
IPADDR='192.168.100.100'
MTU=1500
NAME='My awesome no-name PCI \"bus-mastering\" NE-2000 clone $1.99 CPU-cycle-hogging wondercard'
NETMASK='255.255.255.0'
NETWORK='192.168.100.0'
REMOTE_IPADDR=''
STARTMODE='onboot'
USERCONTROL='no'
_nm_name='bus-pci-0000:01:04.0'
You will want to change it to look like this:
BOOTPROTO='static'
BROADCAST='192.168.100.255'
IPADDR='192.168.100.100'
MTU=1500
NAME='My awesome no-name PCI \"bus-mastering\" NE-2000 clone $1.99 wondercard'
NETMASK='255.255.252.0'
NETWORK='192.168.100.0'
REMOTE_IPADDR=''
STARTMODE='onboot'
USERCONTROL='no'
_nm_name='bus-pci-0000:01:04.0'
IPADDR1='192.168.100.100'
NETMASK1='255.255.255.0'
LABEL1='0'
IPADDR2='192.168.100.101'
NETMASK2='255.255.255.0'
LABEL2='1'
IPADDR3='192.168.100.102'
NETMASK3='255.255.255.0'
LABEL3='2'
Save that and restart networking with '/etc/init.d/network restart' and you are good to go with:
eth0 set to 192.168.100.1
eth0:0 set to 192.168.100.100
eth0:1 set to 192.168.100.101
eth0:2 set to 192.168.100.102
The 'LABELx' settings are just setting the alias label you see after the 'eth0:'
You can get away with leaving out the 'LABELx' statements. One side effect is that you won't see the aliases under 'ifconfig'.
I know you can do this with 'yast' and other utilities but this seems more direct and easier to do on a high latency SSH console.
Credit to :
Wednesday, March 21, 2012

Tuesday, September 13, 2011
IBM Blade Center H : Blade Firmware Hang
If you found this symtomp at your blade server :
1. amber led alert at blade
2. keyboard is blinking
3. server cannot be accessed
You have to follow these steps :
1. Force shutdown
2. Reboot the server
3. During post message, press F2 to enter "Diagnostics"
4. Run the DSA
5. After finish, check to "Report Highlights", major error will be listed like below image :
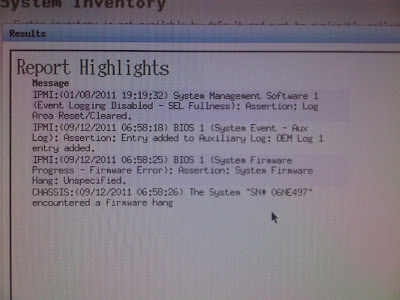
Solution :
1. Need to update the firmware
2. Download from IBM support, the firmware is called as BOMC
3. Put the firmware into the usb drive
4. Reboot the server and press F12 to choose the boot media.
5. Choose boot from usb
6. Firmware installation will be boot up.
7. Choose to update all firmware.
8. After finish,reboot is required.
9. Solved
1. amber led alert at blade
2. keyboard is blinking
3. server cannot be accessed
You have to follow these steps :
1. Force shutdown
2. Reboot the server
3. During post message, press F2 to enter "Diagnostics"
4. Run the DSA
5. After finish, check to "Report Highlights", major error will be listed like below image :

Solution :
1. Need to update the firmware
2. Download from IBM support, the firmware is called as BOMC
3. Put the firmware into the usb drive
4. Reboot the server and press F12 to choose the boot media.
5. Choose boot from usb
6. Firmware installation will be boot up.
7. Choose to update all firmware.
8. After finish,reboot is required.
9. Solved
DB2 Backup Failure : Hard Disk Is Full
If you found this SQLCA Information like this after running "db2 list history backup all for (db_name)". This means that the root cause is hard disk if already full.
====================================================================================
SQLCA Information
sqlcaid : SQLCA sqlcabc: 136 sqlcode: -2419 sqlerrml: 37
====================================================================================
====================================================================================
SQLCA Information
sqlcaid : SQLCA sqlcabc: 136 sqlcode: -2419 sqlerrml: 37
====================================================================================
DB2 Backup Status Indicator
This info is generated when running "List History Backup All For (db_name)"
===========================================================================
Comment: DB2 BACKUP ABCD ONLINE
Start Time: 20060823230001
End Time: 20060824001941
Status: A
===========================================================================
A : Active
I : Inactive
E : Expired
D : Deleted
Referrence : http://bytes.com/topic/db2/answers/527376-list-history-backup-status
===========================================================================
Comment: DB2 BACKUP ABCD ONLINE
Start Time: 20060823230001
End Time: 20060824001941
Status: A
===========================================================================
A : Active
I : Inactive
E : Expired
D : Deleted
Referrence : http://bytes.com/topic/db2/answers/527376-list-history-backup-status
How To Check DB2 Backup History
Follow these steps in terminal :
1. su - db2inst1
2. . ./sqllib/db2profile
3. db2 list history backup all for (db name)
Example : db2 list history backup for all user_db
1. su - db2inst1
2. . ./sqllib/db2profile
3. db2 list history backup all for (db name)
Example : db2 list history backup for all user_db
Friday, September 9, 2011
How to Configure Sudo And Adding Users To Wheel Group
Configuring sudo and adding users to Wheel group
If a server needs to be administered by a number of people it is normally not a good idea for them all to use the root account. This is because it becomes difficult to determine exactly who did what, when and where if everyone logs in with the same credentials. The sudo utility was designed to overcome this difficulty.
With sudo (which stands for "superuser do"), you can delegate a limited set of administrative responsibilities to other users, who are strictly limited to the commands you allow them. sudo creates a thorough audit trail, so everything users do gets logged; if users somehow manage to do something they shouldn't have, you'll be able to detect it and apply the needed fixes. You can even configure sudo centrally, so its permissions apply to several hosts.
The privileged command you want to run must first begin with the word sudo followed by the command's regular syntax. When running the command with the sudo prefix, you will be prompted for your regular password before it is executed. You may run other privileged commands using sudo within a five-minute period without being re-prompted for a password. All commands run as sudo are logged in the log file /var/log/messages.
The sudo configuration file is /etc/sudoers. We should never edit this file manually. Instead, use the visudo command: # visudo
This protects from conflicts (when two admins edit this file at the same time) and guarantees that the right syntax is used (the permission bits are correct). The program uses Vi text editor.
All Access to Specific Users
You can grant users bob and bunny full access to all privileged commands, with this sudoers entry.
user1, user2 ALL=(ALL) ALL
This is generally not a good idea because this allows user1 and user2 to use the su command to grant themselves permanent root privileges thereby bypassing the command logging features of sudo.
Access To Specific Users To Specific Files
This entry allows user1 and all the members of the group operator to gain access to all the program files in the /sbin and /usr/sbin directories, plus the privilege of running the command /usr/apps/check.pl.
user1, %operator ALL= /sbin/, /usr/sbin, /usr/apps/check.pl
Access to Specific Files as Another User
user1 ALL=(accounts) /bin/kill, /usr/bin/kill, /usr/bin/pkill
Access Without Needing Passwords
This example allows all users in the group operator to execute all the commands in the /sbin directory without the need for entering a password.
%operator ALL= NOPASSWD: /sbin/
Adding users to the wheel group
The wheel group is a legacy from UNIX. When a server had to be maintained at a higher level than the day-to-day system administrator, root rights were often required. The 'wheel' group was used to create a pool of user accounts that were allowed to get that level of access to the server. If you weren't in the 'wheel' group, you were denied access to root.
Edit the configuration file (/etc/sudoers) with visudo and change these lines:
# Uncomment to allow people in group wheel to run all commands
# %wheel ALL=(ALL) ALL
To this (as recommended):
# Uncomment to allow people in group wheel to run all commands
%wheel ALL=(ALL) ALL
This will allow anyone in the wheel group to execute commands using sudo (rather than having to add each person one by one).
Now finally use the following command to add any user (e.g- user1) to Wheel group
# usermod -G10 user1
With sudo (which stands for "superuser do"), you can delegate a limited set of administrative responsibilities to other users, who are strictly limited to the commands you allow them. sudo creates a thorough audit trail, so everything users do gets logged; if users somehow manage to do something they shouldn't have, you'll be able to detect it and apply the needed fixes. You can even configure sudo centrally, so its permissions apply to several hosts.
The privileged command you want to run must first begin with the word sudo followed by the command's regular syntax. When running the command with the sudo prefix, you will be prompted for your regular password before it is executed. You may run other privileged commands using sudo within a five-minute period without being re-prompted for a password. All commands run as sudo are logged in the log file /var/log/messages.
The sudo configuration file is /etc/sudoers. We should never edit this file manually. Instead, use the visudo command: # visudo
This protects from conflicts (when two admins edit this file at the same time) and guarantees that the right syntax is used (the permission bits are correct). The program uses Vi text editor.
All Access to Specific Users
You can grant users bob and bunny full access to all privileged commands, with this sudoers entry.
user1, user2 ALL=(ALL) ALL
This is generally not a good idea because this allows user1 and user2 to use the su command to grant themselves permanent root privileges thereby bypassing the command logging features of sudo.
Access To Specific Users To Specific Files
This entry allows user1 and all the members of the group operator to gain access to all the program files in the /sbin and /usr/sbin directories, plus the privilege of running the command /usr/apps/check.pl.
user1, %operator ALL= /sbin/, /usr/sbin, /usr/apps/check.pl
Access to Specific Files as Another User
user1 ALL=(accounts) /bin/kill, /usr/bin/kill, /usr/bin/pkill
Access Without Needing Passwords
This example allows all users in the group operator to execute all the commands in the /sbin directory without the need for entering a password.
%operator ALL= NOPASSWD: /sbin/
Adding users to the wheel group
The wheel group is a legacy from UNIX. When a server had to be maintained at a higher level than the day-to-day system administrator, root rights were often required. The 'wheel' group was used to create a pool of user accounts that were allowed to get that level of access to the server. If you weren't in the 'wheel' group, you were denied access to root.
Edit the configuration file (/etc/sudoers) with visudo and change these lines:
# Uncomment to allow people in group wheel to run all commands
# %wheel ALL=(ALL) ALL
To this (as recommended):
# Uncomment to allow people in group wheel to run all commands
%wheel ALL=(ALL) ALL
This will allow anyone in the wheel group to execute commands using sudo (rather than having to add each person one by one).
Now finally use the following command to add any user (e.g- user1) to Wheel group
# usermod -G10 user1
How To SCP Between Servers Without Passwd Authentication
First of all, we need to generate rsa private key and public key for the source server (vice versa).
ssh-keygen -t rsa
then just hit enter until 2 files is generated in /root/.ssh/ :
1. id_rsa
2. id_rsa.pub
then copy the value of id_rsa.pub into /root/.ssh/authorized_keys in any related servers
after that u can scp to the targeted server without passwd authentication :
1. to get file :
scp root@192.168.2.1:/opt/example /opt
2. to get directory and its content :
scp - r root@192.168.2.1:/opt/example /opt
3. to send file :
scp /root/example root@192.168.2.1:/root
4. to send directory and its content :
scp -r /root/example root@192.168.2.1:/root
ssh-keygen -t rsa
then just hit enter until 2 files is generated in /root/.ssh/ :
1. id_rsa
2. id_rsa.pub
then copy the value of id_rsa.pub into /root/.ssh/authorized_keys in any related servers
after that u can scp to the targeted server without passwd authentication :
1. to get file :
scp root@192.168.2.1:/opt/example /opt
2. to get directory and its content :
scp - r root@192.168.2.1:/opt/example /opt
3. to send file :
scp /root/example root@192.168.2.1:/root
4. to send directory and its content :
scp -r /root/example root@192.168.2.1:/root
Subscribe to:
Posts (Atom)